
Table of Contents
- How to Spot the Signs of Termite Damage in Timber
- What You’ll Need for a Basic Check
- Step 1: Check for Termite Mud Tubes Identification Around the Property
- Step 2: Examine Timber for Hollow Sounds and Blistered Surfaces
- Step 3: Distinguish Termite Damage vs Wood Decay
- Step 4: Inspect Skirting, Frames and Subfloors for Hidden Damage
- Step 5: Understand the Cost of Termite Inspection Townsville Homeowners Pay
- Common Mistakes to Avoid When Checking for Termite Damage
- Conclusion
- Frequently Asked Questions
Last Updated: October 21, 2026
How to Spot the Signs of Termite Damage in Timber
Termite damage in timber often starts where you never look, and by the time it shows on the surface, the structural loss is already real. At Termites Gone Townsville, we’ve spent over two decades inspecting homes across the region, and the pattern is always the same: the earlier you catch it, the cheaper it is to fix.
This guide walks you through seven warning signs, step by step. Most take minutes to check. All of them matter.
Termite damage is the physical breakdown of timber caused by termites eating the wood from the inside out. The damage weakens the structure long before it becomes visible. That’s why knowing what to look for beats waiting for a problem to announce itself.
Below, we’ll show you exactly how to check your own property, where to look, and what to do when you find something.
Never poke or spray a suspected termite nest yourself. Disturbing an active colony can scatter it into new areas of the house, making professional treatment harder and more expensive.
What You’ll Need for a Basic Check
You don’t need special gear for a visual check. A few household items will do:
- A bright torch for dark subfloor and roof spaces
- A flathead screwdriver to tap and gently probe timber
- A screwdriver handle for tapping frames and skirting
- Gloves and a dust mask if you enter a subfloor
- A notepad or phone to record what you find
Work in daylight where possible. Take photos of anything suspicious so you can compare it later or show an inspector.
Step 1: Check for Termite Mud Tubes Identification Around the Property
Termite mud tubes identification is straightforward once you know the shape. Mud tubes are pencil-width tunnels of soil, saliva and timber built by termites to travel safely between their nest and your home.
Walk the perimeter of your house. Look along foundation posts, brick piers and the base of external walls. Tubes are usually brown, grey or reddish and feel crusty when dry.
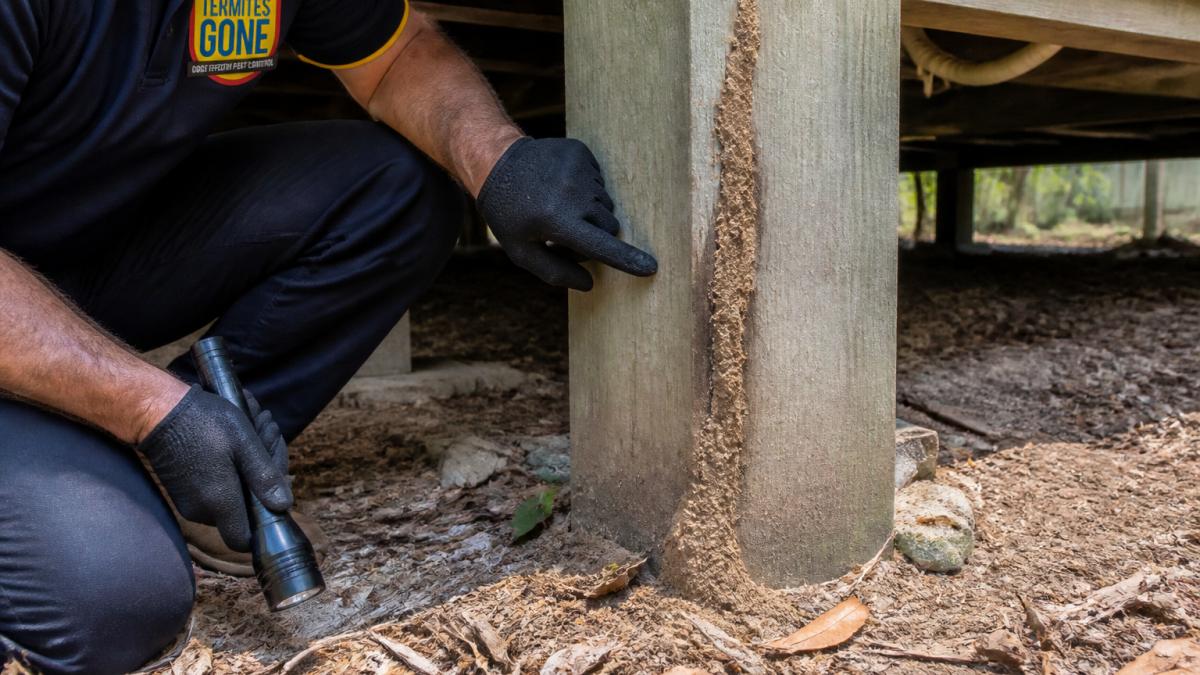
Where Mud Tubes Hide
Mud tubes rarely sit in plain sight. Check these spots:
- Behind garden edging and retaining walls
- Along the base of fence posts and timber sleepers
- In the gap between a concrete slab and the frame
- Around plumbing penetrations and weep holes
- Inside subfloor areas and under the house
A tube doesn’t always mean active termites. Break a small section and check back in a few days. If it’s rebuilt, the colony is live. For official guidance on termite biology and behaviour, see the CSIRO termite research.
Step 2: Examine Timber for Hollow Sounds and Blistered Surfaces
Tap timber with a screwdriver handle and listen. Solid timber gives a firm, dull knock. Termite-damaged timber sounds hollow, papery or thin.
Then check the surface. Blistered paint or timber that looks wavy or rippled often hides hollowed-out wood underneath. Termites eat the soft inner grain and leave a thin skin behind.
Run your hand along skirting boards, door frames and window frames. Bubbling, cracking or a surface that gives slightly under pressure are all worth flagging.
Step 3: Distinguish Termite Damage vs Wood Decay
Termite damage vs wood decay comes down to how the timber fails. Termites eat from the inside and leave clean, smooth-edged galleries. Decay rots from the outside in and feels soft, crumbly or spongy.
Here’s how to tell them apart:
| Feature | Termite Damage | Wood Decay |
|---|---|---|
| Feel | Hollow or papery | Soft and spongy |
| Surface | Blistered, intact skin | Crumbly, stained, flaking |
| Edges of damage | Smooth, clean galleries | Rough, splintered rot |
| Moisture | Can be dry | Usually damp |
| Frass or mud | Mud tubes or pellets | None |
Wood decay needs moisture to grow. Termites need moisture too, but they carry it with them. If timber is dry and hollow, suspect termites.
Step 4: Inspect Skirting, Frames and Subfloors for Hidden Damage
Hidden damage is where the real risk sits. Work through these areas in order:
- Skirting boards: press along the top edge for give
- Door and window frames: check for sticking doors or frames that no longer square up
- Floorboards: look for sagging, springy spots or fine mud trails in joints
- Subfloor: check bearers, joists and stumps for mud tubes and hollow timber
- Roof void: inspect trusses and battens for mud trails and damaged timber
If your home is older with a timber subfloor, this step matters most. Termites often enter through stumps and work upward unseen.
Take a photo of every stump and bearer before you start. Comparing photos a year later is the fastest way to spot new activity.
Step 5: Understand the Cost of Termite Inspection Townsville Homeowners Pay
The cost of termite inspection Townsville homeowners pay depends on the property size, age and access. A standard visual inspection usually costs less than a full thermal or moisture-detection inspection.
Pricing depends on the property, not a flat rate. Call us or visit our site for a current quote.
Cheap inspections often skip the subfloor and roof void. That’s where damage hides. A thorough inspection with a written report costs more upfront but saves thousands in repairs.
For consumer guidance on choosing a pest controller, check the ACCC guidance on hiring tradespeople.
Common Mistakes to Avoid When Checking for Termite Damage
Most missed infestations come down to a handful of errors. Watch for these:
- Only checking the outside of the house and skipping the subfloor
- Treating mud tubes as old damage without checking if they’re rebuilt
- Confusing wood decay with termite damage and ignoring the termites
- Spraying DIY products that scatter the colony
- Skipping annual inspections because “there’s no sign”
- Assuming a brick home is safe, since termites eat frames and trusses too
The single biggest mistake is waiting for visible damage. Termites hide their work, so a clean surface means nothing without a proper inspection.
Conclusion
Catching termite damage early is the difference between a small repair and a major structural bill. If you’ve found mud tubes, hollow timber or blistered surfaces, don’t wait.
At Termites Gone Townsville, we offer comprehensive termite inspections with detailed reports and recommendations. Our team brings over 20 years of experience, uses the latest technology, and backs all general pest control work with a warranty. We also cover end-of-lease pest compliance for rentals.
Get started with Termites Gone Townsville and protect your property before the damage spreads. Call us to book an inspection in Deeragun and across the region today.
Frequently Asked Questions
What does termite damage look like in timber?
Termite damage in timber often appears as hollowed-out sections with a honeycomb or layered pattern, because termites eat timber from the inside out. You may notice blistered or bubbling paint, sagging skirting boards, or timber that sounds hollow when tapped. Unlike rot, the surface may look intact while the inside is eaten away. Check for mud tubes and soft spots, and if you find any of these signs, arrange a professional inspection before the damage spreads further.
How can I tell the difference between termite damage and wood rot?
Termite damage vs wood decay comes down to moisture and texture. Wood rot is caused by fungal growth in damp timber, so it feels soft, crumbly and often dark or stained. Termite damage leaves timber dry and hollow, with clean galleries and no fungal smell. Rot usually appears where water pools or leaks, while termite damage can occur in dry timber too. If you are unsure, a professional inspection can confirm which issue you are dealing with.
Are termite mud tubes a sign of an active infestation?
Mud tubes are one of the clearest signs of an active termite infestation. Termites build these pencil-width tunnels from soil, wood and saliva to travel between their nest and food source while staying protected from light and air. If you break a mud tube open and see live termites inside, the colony is active. Even if the tube appears empty, it may still be in use. Contact a licensed pest controller for a full inspection rather than disturbing the area further.
What should I do if I find termite damage in my home?
Do not disturb the area or spray household insecticide, as this can scatter the colony and make treatment harder. Take photos, note the location, and call a licensed termite specialist for a full inspection. A professional can confirm whether the infestation is active, assess the extent of the damage, and recommend a treatment plan. Early action limits structural repair costs and protects the rest of the property.